


Executive Summary: The Cobalt CLI is a command-line tool that gives engineers, underwriters, and AI agents direct access to Cobalt Intelligence's Secretary of State, OFAC, TIN, UCC, and full verification APIs without writing any HTTP client code. This guide walks through installation, authentication, the four most common command groups, and how to wire the CLI into CI pipelines and AI workflows. Every command below was run live against the v0.4.1 release on a macOS terminal during research for this post.
What Is the Cobalt CLI and Who Should Use It?
The Cobalt CLI is a Node.js package published as @cobaltintelligence/cli on the public npm registry.[1] It wraps the same Cobalt Intelligence REST API that production customers consume,[2] but exposes each endpoint as a single shell command with a stable JSON envelope, deterministic exit codes, and built-in retry persistence. The package is MIT-licensed and shipped its first public release on April 28, 2026.
The CLI is built for three audiences:
• Underwriting and risk engineers who want to verify a Secretary of State filing, OFAC sanctions match, or TIN inside a Bash script, Airflow DAG, or GitHub Actions workflow without standing up an HTTP client.
• AI agents and developer tooling that need a structured, line-oriented interface. The CLI writes data to stdout and logs to stderr, so an agent can pipe results through jq or another tool without log contamination.
• Compliance and operations analysts who need to pull a single ad-hoc verification with full audit evidence (screenshot URL, document list, retry ID) without involving an engineer.
If you already integrate Cobalt's API via direct HTTP calls, the CLI is complementary, not a replacement. It is the fastest way to prototype an integration, run a manual lookup during an incident, or wire verification into a job that doesn't justify a new service.
Three integration patterns each have a place. Direct REST API calls give you the lowest latency and the most control over retry logic, error handling, and request framing, at the cost of building all of that yourself. Hosted KYB platforms (Middesk, Baselayer, and similar) sit on top of underlying SOS data providers and bundle a workflow UI, which adds value for non-technical operations teams but introduces an additional vendor in the chain. The Cobalt CLI is the third pattern: programmatic access with retry, audit, and test concerns built in, talking to the same primary-source Cobalt API that hosted aggregators resell. For lenders who want primary-source data without operating the infrastructure, the CLI plus the underlying API is the shortest path.
What changes for engineering teams using the CLI: Most paid B2B verification APIs ship a REST surface and stop there. Each integrating team rebuilds its own test layer, its own retry layer, and its own audit-evidence handling. The Cobalt CLI bundles those concerns into the binary, which compresses time-to-first-working-integration from days to an afternoon.
How Do You Install the Cobalt CLI in Under 5 Seconds?
Installation requires Node.js 18 or newer.[3] The CLI itself has no native compilation step, so there is no node-gyp rebuild risk in containerized CI runners.
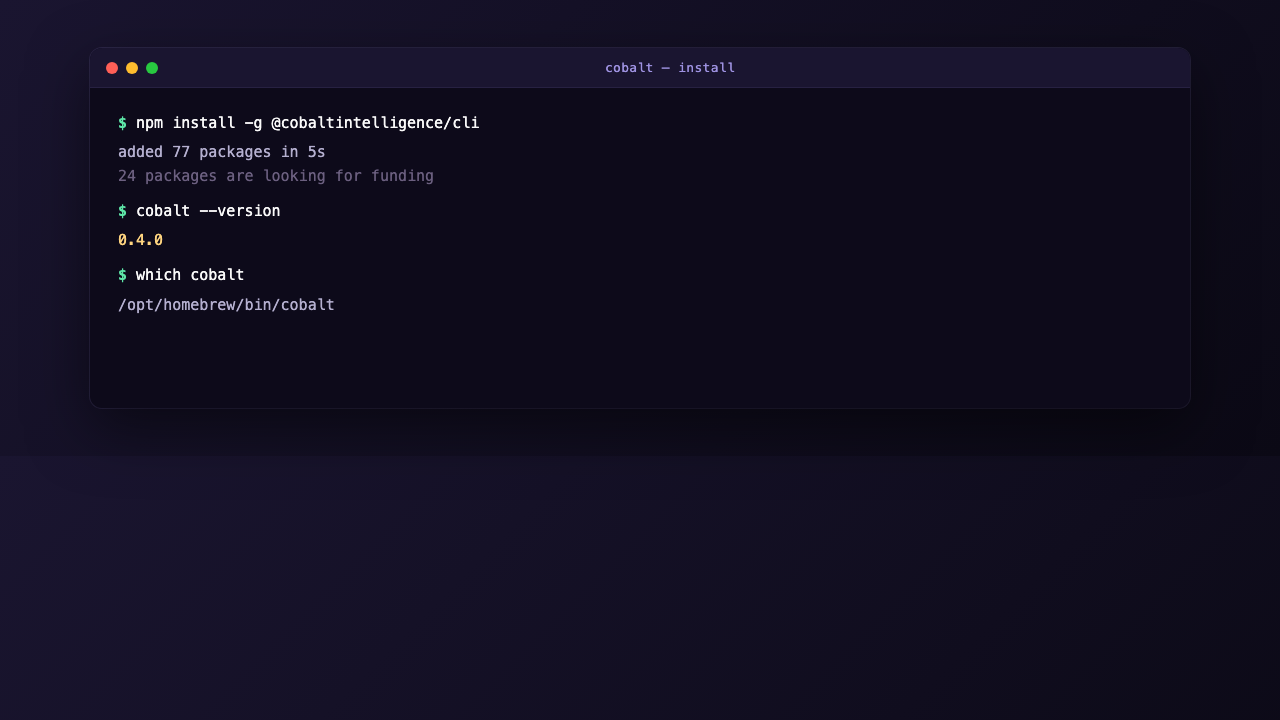
npm install -g @cobaltintelligence/cliOn a fresh macOS install with Homebrew Node, the global install completes in around 5 seconds, adds 77 transitive dependencies, and occupies roughly 9.2 MB on disk at /opt/homebrew/lib/node_modules/@cobaltintelligence/cli. After install, verify the binary is discoverable:
!Cobalt CLI install: npm install -g, version check, and binary path confirmation in terminal
cobalt --version
# 0.4.1
which cobalt
# /opt/homebrew/bin/cobalt
The top-level help surface lists six command groups:
Usage: cobalt [options] [command]

Options:
  -V, --version          output the CLI version
  -f, --format   output format (choices: "json", "pretty", "table")
  -q, --quiet            suppress non-data output
  -v, --verbose          verbose request logging to stderr
  --api-key         override API key
  --endpoint        override API base URL
  --timeout          request timeout in milliseconds (default: "120000")

Commands:
  auth                   Manage API key and authentication
  config                 Inspect and modify CLI configuration
  sos                    Secretary of State business search across 50 states + DC
  ofac                   OFAC and global sanctions list screening
  tin                    IRS TIN verification
  full-verification|fv   All-50-states full verification (long-running, async)
Three flags deserve attention before running any real command. The -f format flag controls output shape: json is the default and pipes cleanly to downstream tools, pretty is human-readable, and table is useful when skimming multiple results. The -v verbose flag writes request logs to stderr while data continues to flow to stdout, which means you can run cobalt sos search ... -v -f json | jq '.data' without log lines contaminating the JSON. The --timeout flag lets you cap request duration in CI, where the 120-second default may be too generous.
How Do You Authenticate the Cobalt CLI Without Exposing Your API Key?
The CLI supports three authentication paths, in order of precedence: an --api-key command-line flag, a COBALT_API_KEY environment variable, and a stored config file populated by cobalt auth login. The stored config path is platform-specific and follows the conventions of the conf package: ~/Library/Preferences/cobalt-cli-nodejs/config.json on macOS, ~/.config/cobalt-cli-nodejs/config.json on Linux, and %APPDATA%\cobalt-cli-nodejs\config.json on Windows.[4] Run cobalt config path to confirm the actual location on your system.
Before authenticating, cobalt auth status returns a fully formed error envelope that doubles as onboarding documentation:
{
  "data": null,
  "meta": {},
  "error": {
    "code": "NO_API_KEY",
    "message": "No API key configured. Run `cobalt auth login`.",
    "details": {
      "onboarding": {
        "signup_url": "https://app.cobaltintelligence.com/create-account",
        "key_url": "https://app.cobaltintelligence.com/dashboard/quickStart",
        "docs_url": "https://documentation.cobaltintelligence.com",
        "support_email": "support@cobaltintelligence.com",
        "human_action": "1. Create a free account ... 2. Copy your API key ... 3. Run `cobalt auth login --key ` ... 4. Verify with `cobalt auth status`"
      }
    }
  }
}
This pattern is intentional. The error envelope ships the signup URL, the dashboard URL where the key lives, the documentation link, and a step-by-step recovery action that an AI agent can follow without hallucinating. The exit code is 4, which is one of nine documented exit codes the CLI uses across all commands.
To authenticate, run:
cobalt auth login --key Two notes on credential hygiene. First, passing the key as a flag puts it in shell history and in the running process list briefly. For CI use, prefer the environment variable approach: set COBALT_API_KEY as a masked secret in your CI provider and skip the login step entirely. Second, after login, the file at cobalt config path stores your key in plaintext. Treat it the way you would treat an SSH private key. Verify perms with ls -la $(cobalt config path) and tighten if your platform stored it with broader read permissions than your environment requires.
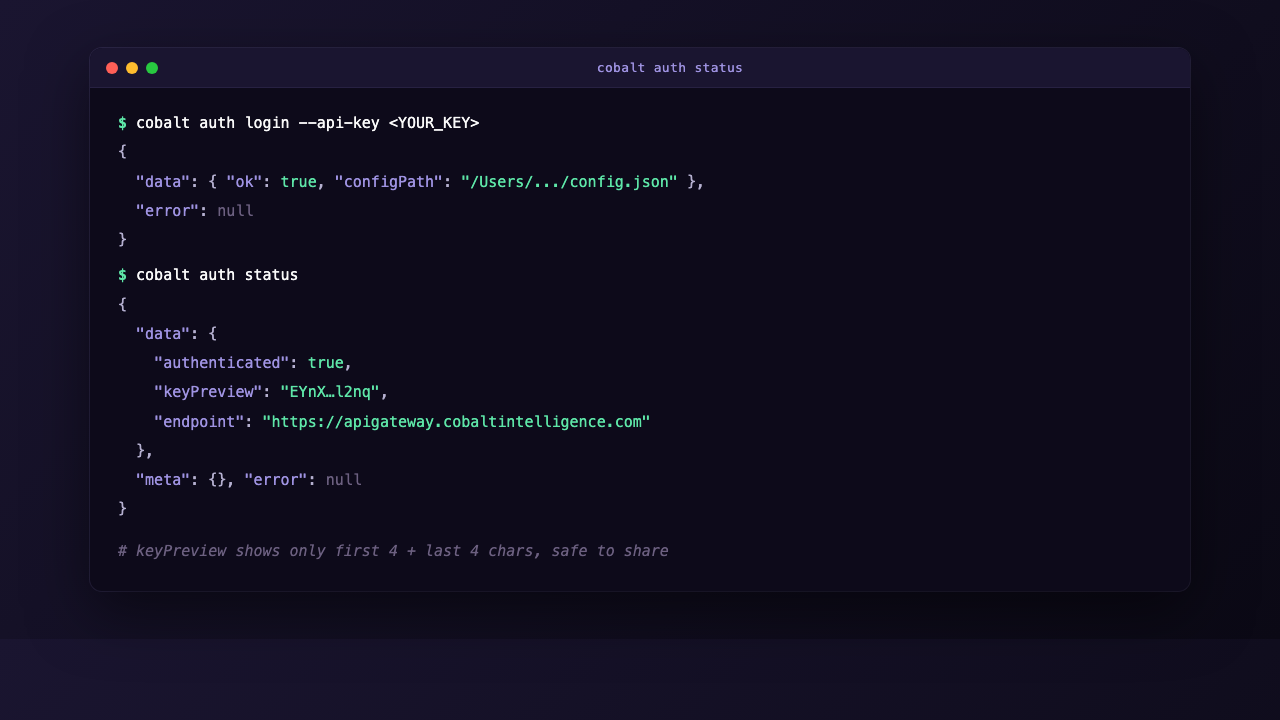
Once authenticated, cobalt auth status returns:
{
  "data": {
    "authenticated": true,
    "keyPreview": "EYnX…l2nq",
    "endpoint": "https://apigateway.cobaltintelligence.com"
  },
  "meta": {},
  "error": null
}
The keyPreview field shows only the first four and last four characters of your key, so you can safely commit screenshots or paste auth status output into a support ticket.
!Cobalt CLI auth login and auth status showing redacted keyPreview
How Do You Run Your First Secretary of State Search From the Command Line?
The cobalt sos search command queries Secretary of State filings across all 50 states plus DC, returning entity status, officers, registered agent, filing history, and an optional short-lived screenshot URL of the actual SOS detail page used for the lookup. This last detail matters for any lender or compliance team that needs a defensible audit trail.[5]
A minimum live search requires a query string and the --state flag:
cobalt sos search "Pizza and Company" --state KY -f jsonThe default poll interval returns the result inline once the underlying scrape completes, typically within 15 to 30 seconds for a single-state search. The full response contains:
• Entity identity. title, entityType, status (with a normalizedStatus field that resolves state-specific codes to a common vocabulary), sosId, confidenceLevel, and filingDate.
• Officers and agent. A list of named principals with their roles, plus the registered agent name and address. Useful for fraud screening when an applicant's listed officers do not match the public filing.
• Filing history. A documents[] array with every historical filing on record, each with a direct PDF link on the state's SOS site. A 45-year-old entity in our test query surfaced 37 historical filings going back to 1980.
• Screenshot URL. When you pass --screenshot, the response includes a presigned S3 URL of the SOS detail page at the time of the search. The URL expires after a short window, so download it immediately if you need it for compliance.
• Possible alternatives. A possibleAlternatives[] array shows fuzzy matches with their own confidence scores (1.00 for exact, 0.67 / 0.60 / 0.53 for partial matches). The matcher exposes its work, which is helpful for audit review.
Three flags expand the verification surface significantly:
• --screenshot. Returns a presigned URL pointing to a snapshot of the actual SOS detail page used for the lookup. Required if your compliance workflow needs to prove what was queried, when, and what the page said.
• --ucc. Pulls UCC-1 lien data filed against the entity. Secured lenders and merchant-cash-advance underwriters use this to detect stacking on receivables before approving a deal.[6]
• --related. Surfaces related entities. Helpful for fraud investigations where principals operate behind shell entities.
cobalt sos search "Apex Auto Repair" \
  --state DE \
  --screenshot --ucc --related \
  -f json
If you omit --state on a non-test call, the CLI returns a BAD_REQUEST error with exit code 5 and a specific message telling you a state is required. The error envelope is consistent across every command in the CLI.
How Do You Screen Businesses Against OFAC Sanctions Lists?
OFAC, the US Treasury's Office of Foreign Assets Control, maintains the Specially Designated Nationals (SDN) list and several other sanctions lists. Any US person or business that processes payments, extends credit, or onboards customers is required to screen counterparties against these lists.[7]
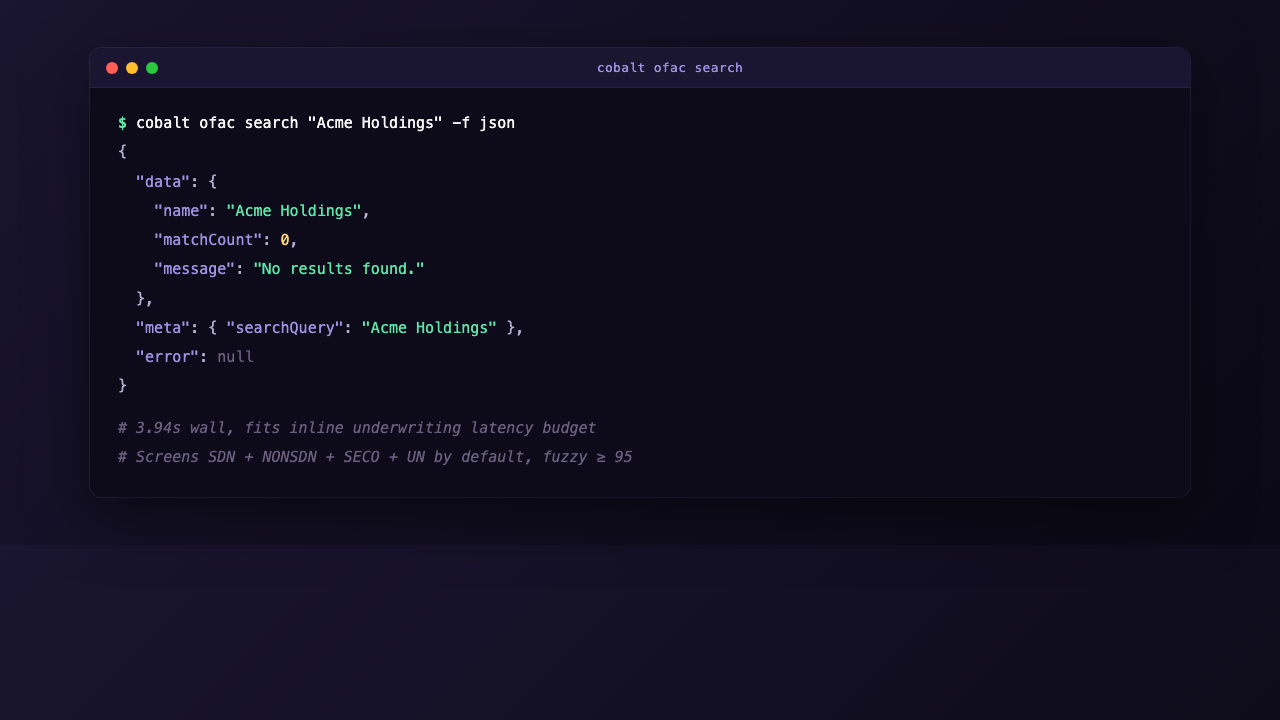
The Cobalt CLI exposes OFAC screening as a single command:
cobalt ofac search "Acme Holdings" -f jsonA clean result returns in roughly 4 seconds (measured at 3.94 seconds wall-clock during a live test from a US-based developer machine; production latency varies with list refresh cycles and request geography), which makes the command latency-fit for inline underwriting flows rather than nightly batch:
{
  "data": {
    "name": "Acme Holdings",
    "matchCount": 0,
    "message": "No results found."
  },
  "meta": { "searchQuery": "Acme Holdings" },
  "error": null
}
Four flags tune the screen:
• --type. Filter by entity type: organization, person, vessel, or aircraft. Default is all four. Most lender workflows only need organization and person.
• --sources. Choose which lists to screen against: SDN, NONSDN, SECO (sectoral sanctions), or UN. Default is all four. SDN is mandatory for US-touching transactions; UN sanctions matter for cross-border exposure.
• --score. Set the fuzzy-match minimum from 80 to 100. Default is 95. Lower values surface more false positives but catch transliteration variants; higher values minimize noise but may miss a hit.
• --address, --state, --city, --postal-code. Geographic disambiguation. A bare-name search for a common name like "Mohammed Smith" can return a sanctions hit that resolves cleanly when geography is added.
For underwriting integrations that need to confirm a counterparty is clear before disbursing funds, the OFAC command is typically the second or third call in a verification waterfall (after Secretary of State and TIN), and its sub-4-second response time is short enough to fit inside the user-facing wait budget of an applicant submitting a credit application.
!Cobalt CLI ofac search returning zero matches across SDN, NONSDN, SECO, and UN lists
How Do You Test the Cobalt CLI Without Spending Credits?
Every paid call against the Cobalt API consumes a verification credit. For development and CI integration, the CLI's --test mode exposes the same JSON envelope as production without billing, which means you can build and test your full integration against realistic response shapes before flipping to live calls.
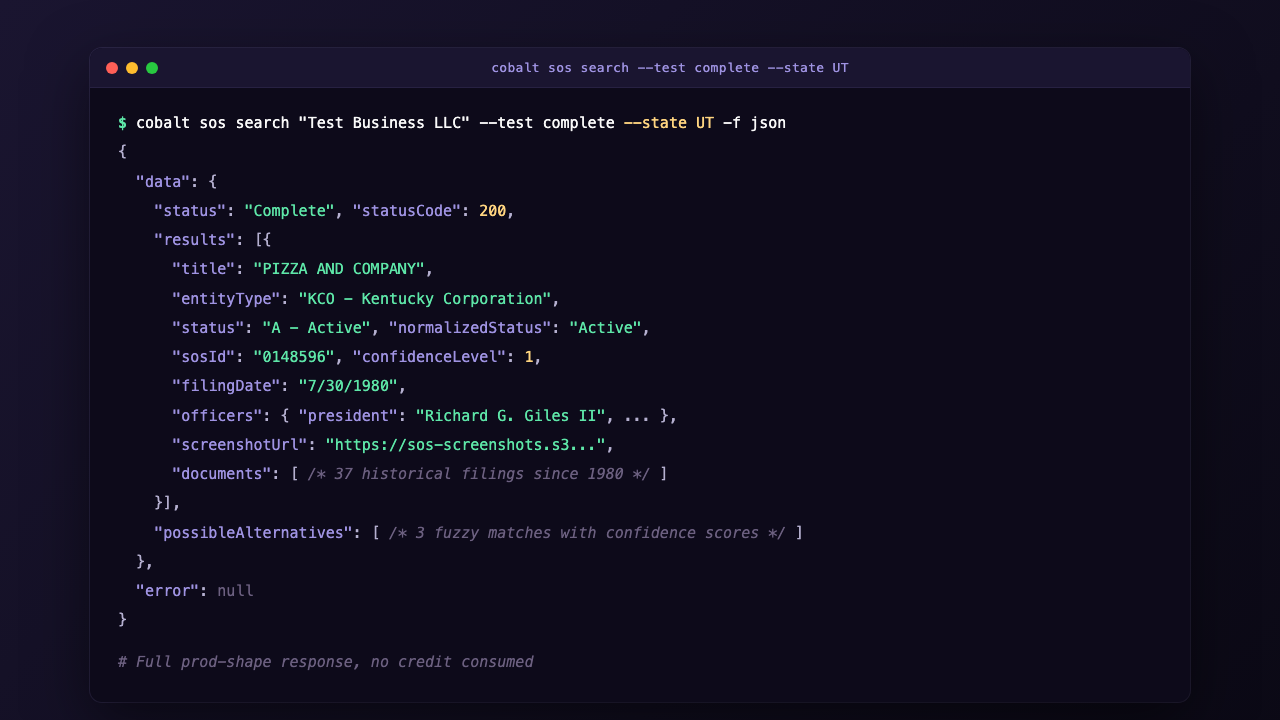
The sos search command supports five test modes:
• --test complete. Returns a fully populated response in the shape of a successful search, with officers, agent, screenshot URL, document history, and possible alternatives. Useful for testing your happy-path code.
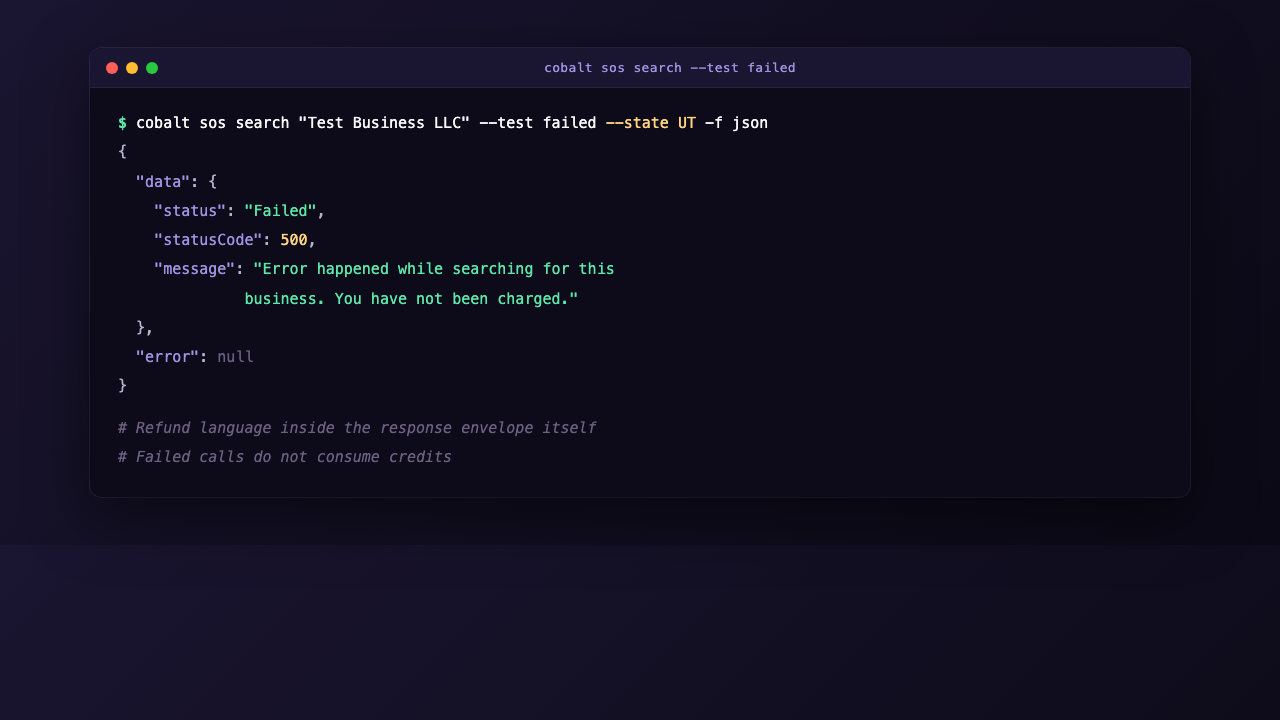
• --test failed. Returns a statusCode: 500 envelope with the message "Error happened while searching for this business. You have not been charged." The refund language ships inside the response envelope itself.
• --test badRequest. Returns the validation-error shape so you can test your error handler against the exact message format the live API uses.
• --test retryIdInvalid. Returns the shape returned when a --retry-id resume call references an unknown retry ID.
• --test incomplete. Returns the shape for a long-running search that is still processing.
Example:
cobalt sos search "Test Business LLC" --test complete --state UT -f jsonThe response is shaped identically to a live Complete result, including a populated screenshotUrl field pointing to a Cobalt-hosted demo asset. When you remove --test complete, no code on your side changes. This pattern is consistent with how mature developer-tool CLIs ship test surfaces.[8]
!Cobalt CLI test failed response with "You have not been charged" message inside the envelope
The --test mode does not currently extend to the OFAC and TIN commands, so for those endpoints you will need to design your test fixtures from a recorded live response. For CI workflows that exercise the full waterfall, run your SOS step in test mode and stub OFAC and TIN with recorded responses.
How Do You Use the Cobalt CLI in CI/CD Pipelines and AI Agents?
Three CLI design choices make it well-suited for CI and AI-agent use: a stable JSON envelope, deterministic exit codes, and stdout/stderr separation. Together they mean the CLI behaves like a Unix tool, not a wrapper around a chatty SDK.
The JSON envelope is identical on success and failure:
{
  "data":  { /* the payload, or null on error */ },
  "meta":  { /* request metadata: state, polled, retryId */ },
  "error": { /* code, message, details, or null on success */ }
}
Any downstream tool can check .error for a null and route accordingly. Exit codes follow a documented nine-code contract so a Bash script can take different actions for BAD_REQUEST versus NO_API_KEY versus a rate-limit response without parsing the JSON at all.
In a GitHub Actions workflow, a typical inline OFAC check looks like this:
- name: OFAC pre-disbursement screen
  env:
    COBALT_API_KEY: ${{ secrets.COBALT_API_KEY }}
  run: |
    cobalt ofac search "${{ inputs.business_name }}" -f json \
      | tee ofac.json \
      | jq -e '.data.matchCount == 0'
If the OFAC hit count is non-zero, jq -e exits non-zero and the workflow fails before the disbursement step runs. The ofac.json artifact is uploaded as part of the run, giving compliance a permanent record.
For AI agents, the CLI's --api-key flag and structured output make it directly compatible with tool-calling patterns in major agent frameworks, including the Model Context Protocol surface Anthropic uses for Claude agents.[9] An agent given access to the cobalt binary as a tool can run a verification, parse the JSON envelope, and present a structured summary without hallucinating signup URLs or invented endpoints, because every error envelope ships a real onboarding block.
For long-running verification work, the CLI's sos retry and sos pending commands manage retry IDs persisted to disk during a long call. When a SOS search takes longer than the configured poll window or your CI runner dies mid-call, a JSON file is written to cobalt sos pending lists every in-flight call, and cobalt sos retry resumes any of them without re-billing. This means a CI runner that crashes during a 30-second SOS poll does not cost you a duplicate paid call when the workflow re-runs.
The Cobalt full-verification command, cobalt fv, drives the long-running 50-state coordinated verification asynchronously. It exposes three subcommands: cobalt fv start to kick off a verification (returns a searchGuid), cobalt fv status to poll for results, and cobalt fv wait to block until the run completes. For event-driven architectures, pass --callback-url to fv start and Cobalt will POST the completed result to your endpoint, avoiding polling overhead. For workflows that prefer pull-based integration, cobalt fv status returns the same JSON envelope and works cleanly inside CI loops:
GUID=$(cobalt fv start --business-name "Apex Auto Repair" --business-state DE -f json | jq -r '.data.searchGuid')
cobalt fv status "$GUID" -f json
The current release on npm is @cobaltintelligence/cli@0.4.1, published May 14, 2026.
For a parallel walkthrough that focuses on how the CLI fits a merchant-cash-advance underwriting workflow specifically, including UCC stacking detection and officer-mismatch fraud signals, see Cobalt's evaluation of the Cobalt CLI for MCA underwriting. For deeper background on the verification surface the CLI exposes, the court records due diligence guide and the OFAC screening integration guide cover the legal and procedural context lenders need before wiring these calls into a credit decision.[10]
To talk through Cobalt CLI integration scope, volume pricing for production rollout, or a pilot for your underwriting waterfall, schedule a demo with the Cobalt Intelligence team.[11]


.png)